Progress Report 7 3/2/18
Since the last progress update, we have acquired new parts for our model, pursued research into new types of materials to be used for tubing and strain gauges, and carried out further tests for our model.
Up until this point, the pressure gauges that we had purchased only had the ability to measure the pressure of a model instantaneously. That is, they were unable to provide us with continuous data on how the pressure was changing from moment to moment. As a result, we were unable to determine if the instantaneous pressure was due to an outlier or an actual measurement. When researching continuous pressure gauges that could output the data to a computer for analysis, we found the gauges to be incredibly expensive. Additionally, they would have taken several weeks to arrive. As a result, our group reached out to Dr. Forrest Charnock, the director of undergraduate physics lab to see if he would have a pressure gauge that is continuous that we could use. Fortunately, he was able to provide us with a continuous absolute pressure gauge that can output the data to a program on a computer. The gauge and the program are from a company called Pasco. The data program is called Capstone. This pressure gauge measures absolute pressure in kilopascals, which can easily be converted to our desired unit: mmHg.
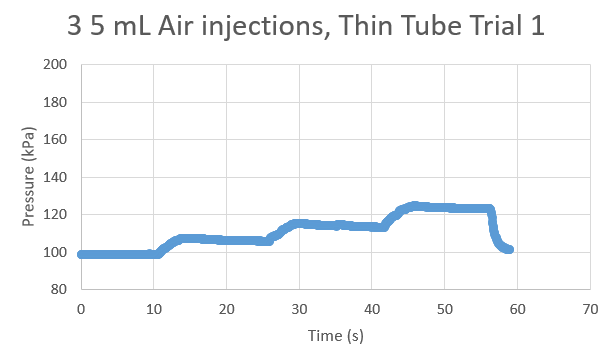
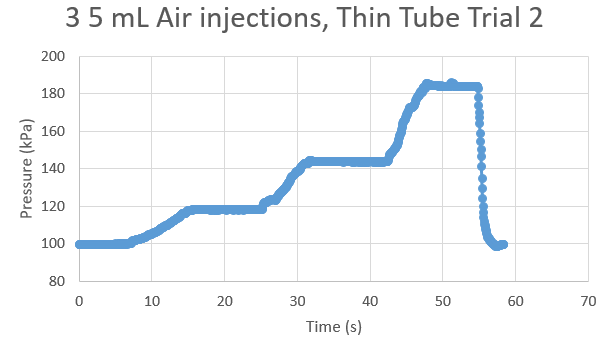
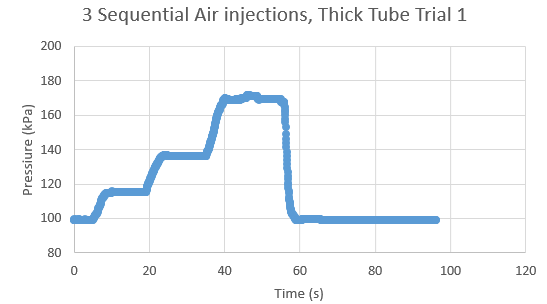
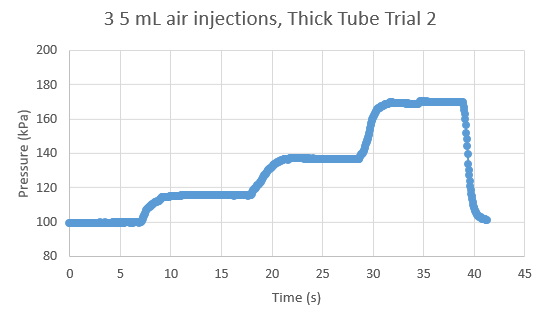
When testing the new pressure gauge, it initially did not seem to be functioning, as it would not transduce any pressure changes to the data program, nor would it display accurate atmospheric pressure at the start. After consulting with Dr. Charnock, we found the problem to be a faulty connection wire. Once the pressure gauge was up and running, we decided to run a few tests. The pressure gauge came with a stiff, thick tube that is much different from the pliable silicone tubing (and hopefully more pliable latex or other tubing that we will use). This tube provided by Dr. Charnock is incompatible with our model because it’s inner diameter is too small to use with our T-tubes. We wanted to see if the pressure changes induced by a syringe would be constant and predictable in both the thick tubing and our softer tubing. We incrementally decreased the volume in the tube (thus increasing the pressure) by pushing the syringe in by increments of 5mL up to 15mL. Our results showed that the pressure gauge picked up a stable increase in pressure in the case of both tubing scenarios. However, with the silicone tubing, the increase in pressure was much greater than with the stiffer tubing. This can be attributed to the fact that the stiffer tubing was longer than the silicone tubing and thus held more volume of air. When we increased the volume by the same amount, the pressure would increase much more as a result. Still, we got consistent values for pressure increase based on volume decrease. These results can be shown here:
Additionally, we have been investigating more pliable tubing to allow for better pressure transduction across the wall of the tube. This is because we want our model to represent anatomy accurately in the sense of pressure transduction. On the advice of both Dr. Froehler and Dr. Walker, we looked into a few options, namely the use of latex tubing, the manual creation of our own tubing using an elastic material, and the pursuit of still thinner silicone tubing. This week, we looked into the latex tubing option and found an option that fits our dimensions. We have ordered this tubing and it should be arriving after Spring Break.
©2026 Vanderbilt University ·
Site Development: University Web Communications