Ultrasound Update 2: March 17, 2020

Morgan Kinney, Tanner Hoppman, Jude Franklin

This week we were able to complete the building and testing of our T/R switch. Since we were unsure the cause of our T/R switch malfunctions from before, we re-soldered all of the components, which fixed the issue. The return loss measurements at each port shown in Element 1 were all within expected ranges, indicating our switch was working properly. The image in Element 2 was obtained by injecting a 5 MHz signal into the transducer port and measuring the signal at the receive port. The signal remaining at 5 MHz frequency also indicates that our switch was functioning properly.


Element 1. Return loss measurements at each port of the T/R switch.

tablereturnloss

Element 2. Image of oscilloscope measuring the 5 MHz signal detected at the receive port of the T/R switch when a 5 MHz signal is generated through the transducer port.

osimage

Question: How would you express this (an open circuit) mathematically?

Answer: An open circuit is represented mathematically by an infinite impedance, so that there can be no current flow.

Ultrasound Update 1: February 25, 2020

Morgan Kinney, Tanner Hoppman, Jude Franklin

This week while finishing our data acquisition for the IR CT scanner we were able to begin working on our next project, the ultrasound machine. Our first step was creating the phantom to be imaged once we build our ultrasound probe. This was done by combining water with agar and graphite, heating it up in a microwave, and then cooling it and inserting a 3-D printed shape part-way through the cooling process. Next, we built our transmit/receive switch using the board shown in Fig. 1 to match the circuit diagram in Fig. 2 with ceramic chip capacitors, a surface mount inductor, SMA connectors, and four Schottky diodes. The last thing we did was enclose our switch in a metal enclosure for storage so that our next step will be to test it to make sure our soldering has been done properly.

Figure 1. Transmit/Receive switch board used to build T/R switch.

3d pcb

Figure 2. Transmit/Receive switch diagram. The quarter-wave line is modeled through a pi network of two identical capacitors and an inductor.

kXMdskor0e2HErv_WoRYkJajAs1yrA5kcPd3k1tpEWH3M2CawCIsqjII5kfwpObtbdKRazVQKYWiireGVo93cICmGOG2viCqCxsc1wtpeKvc-y-T48YdsEEPe5PBWPRN3e85UVXl

Question: Under what conditions do each pair of crossed diodes turn on? 

Answer: In Fig. 2, the diodes between TX and the probe turn on when the TX amplifier produces large voltages during transmit to induce a loss of power, and the other diodes turn on when the transducer acts as a source producing small voltage signals during receive.

Infrared CT Update 6: February 18, 2020

Morgan Kinney, Tanner Hoppman, Jude Franklin

This week we were unfortunately unable to meet our goal of finishing the IR CT project. After completing another scan, we were able to improve our reconstruction algorithm to obtain the better image quality seen in Fig. 2, but we knew that something else still had to be off. The image is closer to being able to distinguish the phantom used, but after analyzing our sonogram in Fig. 1 we noticed that it is abnormally slanted. At the very end of the week we found the problem: our stepper motor had 200 steps instead of the correct amount of 201. The result is that the stepper motor is one step short of 360 degrees every rotation and our reconstruction gives the image in Fig. 2. With these issues resolved, we are almost certain that our next scans will give better images. We should be able to complete the scans required and move onto our next project (ultrasound) this week.


Figure 1. Image sinogram

Screen Shot 2020-02-17 at 9.51.59 AM

Figure 2. Reconstructed image

Screen Shot 2020-02-17 at 9.52.11 AM

Question: What happens if you more coarsely or finely sample the fan beam angles?

Answer: Fan beam angles are currently sampled at 1 degree steps. If we were able to sample them more finely, there would be no difference because the stepper motor is the limiting element for resolution since it steps at 1.8 degrees per step. If the fan beam angles were sampled more coarsely than the 1.8 degrees, they would then become the limiting factor and resolution would be negatively impacted.

Infrared CT Update 5: February 11, 2020

Morgan Kinney, Tanner Hoppman, Jude Franklin

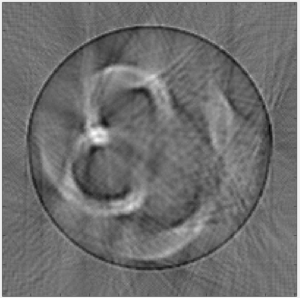
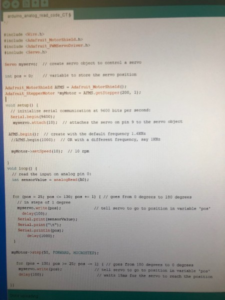
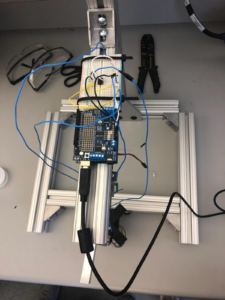
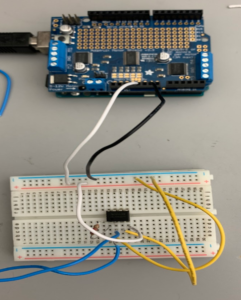
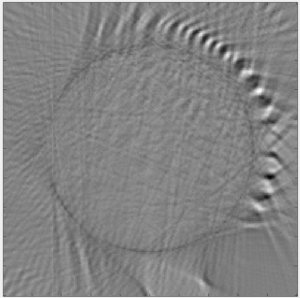
This week we were able to complete the assembly of our scanner and the code to run it so that we could acquire the projection data for our first image reconstruction. The Matlab code used for the reconstruction (Fig. 1) was a modified template designed to work for these IR CT scanners, but in the reconstructed image (Fig. 2) it is impossible to tell which phantom was used. This poor image quality was likely a result of either our method of acquiring the projection data, the reconstruction algorithm, or some other external influence on the system. In any of these cases, we hope to resolve the issue and complete scans and reconstruct images for all the different phantoms with reasonable image quality by the end of the next week.


Figure 1. MATLAB code for fan-beam reconstruction of real projection data

% recon data from an ir ct scanner


%%%%%%%%%%%%%%%%%%%%%%%%%%%

% load the projection data

%%%%%%%%%%%%%%%%%%%%%%%%%%%


% full phantom data – acquired over 360 degrees of stepper motor

load servoangle; % data file you generate – needs to contain diodeVoltage, servoAngle, and stepAngle

load step

load voltage

%%%%%%%%%%%%%%%%%%%%%%%%%%%

% recon parameters

%%%%%%%%%%%%%%%%%%%%%%%%%%%

N = 200; % matrix size

FOV = 14; % cm, FOV of image matrix

Dcm = 6.9; % cm, distance from fan beam vertex to center of stepper motor shaft

D = Dcm*N/FOV; % vertex->center distance in pixels

fanCenterAngle = 80; % fan center angle 

fanAngleWidth = 90; % total width we need in degrees for the fan beam to cover the object


%%%%%%%%%%%%%%%%%%%%%%%%%%%

% subtract off the center fan angle from the servo angles, to center them

%%%%%%%%%%%%%%%%%%%%%%%%%%%

servoAngle = servoAngle – fanCenterAngle;


%%%%%%%%%%%%%%%%%%%%%%%%%%%

% reshape data into a fan beam sinogram matrix. We assume that servo angle

% is minor dim in diodeVoltage vector

%%%%%%%%%%%%%%%%%%%%%%%%%%%

nServoAngles = length(unique(servoAngle));

nStepAngles = length(unique(stepAngle));

fanBeamData = reshape(diodeVoltage,[nServoAngles,nStepAngles]);


%%%%%%%%%%%%%%%%%%%%%%%%%%%

% interpolate along the fan beam dimension to center the data

%%%%%%%%%%%%%%%%%%%%%%%%%%%


% find increment between servo Angles

deltaServoAngle = abs(diff(unique(servoAngle)));deltaServoAngle = deltaServoAngle(1);

% find increment between stepper motor angles

deltaStepAngle = abs(diff(unique(stepAngle)));deltaStepAngle = deltaStepAngle(1);


% get input (I) and output (O) interpolation grids

servoAnglesI = min(servoAngle):deltaServoAngle:max(servoAngle);

stepAngles = min(stepAngle):deltaStepAngle:max(stepAngle);

[stepAnglesI,servoAnglesI] = meshgrid(stepAngles,servoAnglesI);

servoAnglesO = -fanAngleWidth/2:fanAngleWidth/2;

[stepAnglesO,servoAnglesO] = meshgrid(stepAngles,servoAnglesO);


% do the 2D interpolation to the centered grid that we will use for recon

fanBeamDataCent = interp2(stepAnglesI,servoAnglesI,fanBeamData,stepAnglesO,servoAnglesO,’cubic’,0);


%%%%%%%%%%%%%%%%%%%%%%%%%%%

% reconstruct the image

%%%%%%%%%%%%%%%%%%%%%%%%%%%

img = ifanbeam(fliplr(fanBeamDataCent),D,’fancoverage’,’cycle’,’fanrotationincrement’,…

    deltaStepAngle,’fansensorgeometry’,’arc’,’fansensorspacing’,1,…

    ‘filter’,’Ram-Lak’,’frequencyscaling’,1,’interpolation’,’nearest’,…

    ‘outputsize’,N);

figure;imagesc(-img);axis image;colormap gray


Figure 2. Reconstructed image from real projection data

image

Question: What parameters of your scanner and scan method influence resolution? Investigate these. 

Answer: Our resolution for these IR CT scanners is determined by the data acquisition rate set by the arduino, the step angle of the servo arm, and the step angle of the stepper motor. Assuming that the arduino baud rate is sufficient, the stepper motor would be the limiting factor of resolution because it has a minimum step angle of 1.8 degrees while the servo arm can move just 1 degree per step.

Infrared CT Update 4: February 4, 2020

Morgan Kinney, Tanner Hoppman, Jude Franklin

This week we spent much of our time troubleshooting an issue with an unknown cause, which we finally resolved with the discovery that our IR LED no longer functioned. This issue was seen in the fact that our serial monitor did not output changing values as the the distance between our LED and diode was varied. Once confirming that our emitter-detector system was working and being measured properly, we programmed the arduino to print to the serial monitor the three values we will need for reconstruction: voltage measurement, servo angle, and stepper angle. We were also able to finish our reconstruction program in matlab and test it on sample projection data to obtain an image (Fig. 1-2). The last steps to being able to reconstruct to an image will be modifying the scan parameters for the servo and stepper motors to get the best image and transferring the data into Matlab.

Figure 1. MATLAB code for fan-beam reconstruction of sample projection data

clear all

load fanBeamProjectionData

theta1=reshape(stepperAngle,269,360);

voltage1=reshape(voltage,269,360);

[rad, xp]=radon(voltage1,theta1(1,:));

figure(1)

imagesc(theta1(1,:),xp,voltage1)

colormap(hot)

colorbar


N = 220; % matrix size

FOV = 10; % cm, FOV of image matrix

Dcm = 7.78; % cm, distance from fan beam vertex to center of stepper motor shaft

D = Dcm*N/FOV; % vertex->center distance in pixels


figure(2)

img = ifanbeam(voltage1,D,’FanSensorSpacing’,.5,’OutputSize’,N);

imagesc(img);axis image;colormap gray


Figure 2. Reconstructed image from sample projection data

samplerecon1

Question: Which way does your photodiode need to be oriented to get a positive output voltage?

Answer: The photodiode needs to be oriented with the positive end connected to ground and the negative end connected to the inverting input of the op amp. This allows for the negative current through the photodiode to be powered by the op amp from the output to ground.

Infrared CT Update 3: January 28, 2020

Morgan Kinney, Tanner Hoppman, Jude Franklin

This week we were able to connect the motors to our Arduino circuit. We spent our time programming both the stepper motor and servo arm to work in tandem. This was particularly tricky because we had to refine their range of motion, but we had issues with getting their code to work without interfering with each other. When adding the stepper motor, the normally functioning servo started malfunctioning. We concluded this week with fully functioning code for all the mechanical components as seen in the video under Element 1 and the image of the Arduino code in Element 2. The next step will be to code the matlab programming for the imaging of the scanner itself.

Element 1: Video of functioning servo arm and stepper motor

servoarmsteppermotor

Element 2: Image of Arduino code to program the moving parts

imagingcode128

Question: Why is the fan2para() function needed?

Answer: The projection data obtained from our IR CT device is fan-beam projection data, and the matlab program is set up to reconstruct parallel beam projections. Thus, fan2para is needed to convert our data from fan-beam to parallel beam in order to be reconstructed into the final images.

Infrared CT Update 2: January 21, 2020

Morgan Kinney, Tanner Hoppman, Jude Franklin

This week we were able to continue troubleshooting our circuits. By using a multimeter, we were able to determine if the voltage at the input and outputs of the circuit was reactive to the LED and IR photodiode (Element 1). Initially, we had the setbacks of the IR LED being shortcircuited, thus we had to re-solder the connections. After we were able to determine a proper relationship between the distance between the photodiode and the LED and their relative output voltage by changing our feedback resistor to a megaohm, we focused on uploading Arduino code to read the analog input and translate that into the Serialread function. Thus, we were able to see the live read-outs of the voltage values on the serial monitor as the IR LED and photodiode distance changed. We left off attempting to transfer the serial monitor values into Matlab where they will be much more useful for image reconstruction (Element 2).

Element 1: Placement of the breadboard and Arduino on the frame. This location will allow for the circuits to remain intact while the servo arm moves during image acquisition.

irct

Element 2: Arduino and Matlab code used to communicate serial port data with Matlab.

Arduino code:

byte incomingByte1;

void setup(){

 pinMode(2,OUTPUT);

 Serial.begin(115200);

 Serial.println(“Ready”);      

}

void loop() {

 digitalWrite(2,LOW); //turn off LED

 delay(500);

if (Serial.available() > 0) {

digitalWrite(2,HIGH); //flash LED everytime data is available

delay(500);

incomingByte1 = Serial.read(); //read incoming data

Serial.println(incomingByte1,HEX); //print data

}

}


Matlab code:

clear

clc

s=serial(‘COM7’,‘BaudRate’,115200);

fopen(s);

readData=fscanf(s) %reads “Ready”

writedata=uint16(500); %0x01F4

fwrite(s,writedata,‘uint16’) %write data

for i=1:2 %read 2 lines of data

readData=fscanf(s)

end

fclose(s);

delete(s);


Question: How can you limit current into the LED to avoid damaging it?

Answer: By connecting a resistor in series with the LED and the Arduino power source, the current of the total circuit is reduced, which decreases the chances of damaging the LED. This does, however, decrease the voltage drop across the LED, which decreases its brightness, but using a moderately low resistor value (1kOhms) allows this effect to be minimal.

Infrared CT Update 1: January 14, 2020

Morgan Kinney, Tanner Hoppman, Jude Franklin

This week we were able to obtain our photodiode and infrared LED and secure them into their holders. We soldered lead wires to the ends of each of these to eventually connect them to the Arduino. To power the IR LED, we designed a simple circuit using the Arduino’s 5 volt power source connected in series to the LED and a resistor to decrease the current through the LED and avoid damaging it. 

The image below shows our initial attempt at building the photodiode circuit, which is a current-to-voltage converter taking the input current from the photodiode and outputting a voltage through the TLV2322 op amp to be read by the Arduino.

Our next steps will involve optimizing the outputs of both the LED and the photodiode to obtain the best possible data. This will require tweaking of the resistor values in both circuits and evaluating the voltage outputs when the LED and photodiode are at their 10 cm set distance.

Screen Shot 2020-01-14 at 11.13.24 AM