3/10/2020: Ultrasound Scanner Update #2

This week, we began making a sinusoidal function generator to test our T/R switch. Below is the pulse-echo sequence flow graph we made that outputs a pulse of 1 microsecond duration separated by a tunable pulse repetition time.

1

Figure 1: Block diagram of our multiplier

Question: The simplest solution using the above three elements has an upper limit on the pulse repetition time because of the very large delays required. How can you modify it so you only use a 1 microsecond delay?

By inverting any given time varying signal (i.e. multiplying by -1 so as to flip all the values about the time axis) and then summing the inverted and non-inverted signals together, the result will be 0. Using this approach to generate the 1 microsecond delay is more feasible since it does not require a large amount of memory bandwidth. Given a 1 Megahertz signal, the period for a single sample will be 1 microsecond. By delaying an inverted 1 MHz signal one sample we are in essence generating two signals (one inverted one non-inverted) that differ by only 1 microsecond. By summing these two signals together, we generate a pulse of only 1 microsecond. Our block diagram is shown in Figure 1.

Below are images of the progress we made on the ultrasound scanner before Vanderbilt yeeted us out.

2

Figure 2: Sinusoidal source waveform

3

Figure 3: Pulse width modulation signal. This scope capture represents our efforts at attempting to generate the 1 microsecond pulse

4

Figure 4: This picture shown above represents our first attempt at generating the 1 microsecond pulse delay. This approach fails since it requires us to delay the second signal by too many samples which requires too much memory bandwidth.

5

Figure 5: This waveform shown above represents the 1 microsecond pulse that we successfully generated using the radio blocks in Fig.


Ultrasound Scanner Update #1:

This week, we built our T/R switch and measured power return loss. After calibrating, we measured the power return loss at each port. We got a higher power return loss than expected, so we realized that we accidentally used 6.8 pF capacitors instead of 680 pF capacitors. Then, we used 680 pF through-hole capacitors. Dr. Grissom warned us that he did not know how these capacitors would react to radio frequency, so we replaced these capacitors with the surface mounted ones we were given. Below are the power return losses we observed from each port with the different capacitors.

Through-hole capacitor

Transmit out port

Receive open: 1.32 dB

Receive 50 ohms: 23.05 dB


Receive port

Transmit open: 1.36 ohms

Transmit 50 ohms: 9.46 dB


Surface mounted capacitor

Transmit in port:

Transmit out is open: 0 dB

Transmit out 50 ohms: 0 dB

Transmit out port:

Receive open: 0.77 dB

Receive 50 ohms: 23.57 dB.

Receive port:

Transmit out open. 0.77 dB

Transmit out 50 ohms. 23.31 dB


IMG_0198

Figure 1: T/R switch set to 5 MHz input to transmit out looking at receive port

IMG_0195

Figure 2: Oscilloscope of T/R switch set to 5 MHz input to transmit out looking at receive port

Question:

With the components we have, how close do you come to satisfying the two conditions above?

We used a 680 pF capacitor and and a 1.5 uH inductor. The capacitor is slightly larger and the inductor is slightly smaller than the desired values.


Update #6: Wrapping up IR CT scanner and beginning to build the Ultrasound Scanner

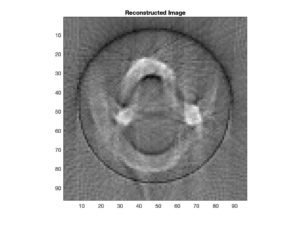
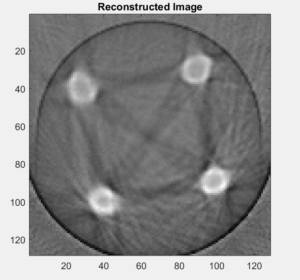
This week, we finally obtained a good reconstructed image from our scanner. The trick was adding the function fliplr! Below is our Matlab code and our reconstructed image.

Matlab code

% recon data from an ir ct scanner

%%%%%%%%%%%%%%%%%%%%%%%%%%%

% load the projection data

%%%%%%%%%%%%%%%%%%%%%%%%%%%

% full phantom data – acquired over 360 degrees of stepper motor

load ‘dataTEST_full.txt’; % data file you generate – needs to contain diodeVoltage, servoAngle, and stepAngle

diodeVoltage = dataTEST;

servoAngle = 40:1:128;

stepAngle = 0:1.8:269*1.8;


% %[row col] = size(data);

% outputflipped = zeros(270,89);

% % output = reshape(diodeVoltage, [271 89]);

% outputflipped(2:2:end,:) = fliplr(diodeVoltage(2:2:end,:));

% outputflipped(1:2:end,:) = diodeVoltage(1:2:end,:);


% %odd number rows

% %for ii = 1:2:col/2

%     %output(ii, 🙂 = diodeVoltage(ii, 1:col/2);

% %end

% %even number rows

% for ii = 2:2:col/2

%     output(ii, 🙂 = fliplr(diodeVoltage(ii-1, 1+col/2:col));

% end


%%%%%%%%%%%%%%%%%%%%%%%%%%%

% recon parameters

%%%%%%%%%%%%%%%%%%%%%%%%%%%

N = 128; % matrix size

FOV = 12; % cm, FOV of image matrix

Dcm = 9; % cm, distance from fan beam vertex to center of stepper motor shaft

D = Dcm*N/FOV; % vertex->center distance in pixels

fanCenterAngle = 90; % fan center angle 

fanAngleWidth = 89; % total width we need in degrees for the fan beam to cover the object

%%%%%%%%%%%%%%%%%%%%%%%%%%%

% subtract off the center fan angle from the servo angles, to center them

%%%%%%%%%%%%%%%%%%%%%%%%%%%

servoAngle = servoAngle – fanCenterAngle;

%%%%%%%%%%%%%%%%%%%%%%%%%%%

% reshape data into a fan beam sinogram matrix. We assume that servo angle

% is minor dim in diodeVoltage vector

%%%%%%%%%%%%%%%%%%%%%%%%%%%

nServoAngles = length(unique(servoAngle));

nStepAngles = length(unique(stepAngle));

fanBeamData = diodeVoltage;

%fanBeamData = reshape(diodeVoltage,[nServoAngles,nStepAngles]);

%potVoltage = reshape(potVoltage,[nServoAngles,nStepAngles]);

%%%%%%%%%%%%%%%%%%%%%%%%%%%

% interpolate along the fan beam dimension to center the data

%%%%%%%%%%%%%%%%%%%%%%%%%%%

% find increment between servo Angles

deltaServoAngle = abs(diff(unique(servoAngle)));deltaServoAngle = deltaServoAngle(1);

% find increment between stepper motor angles

deltaStepAngle = abs(diff(unique(stepAngle)));deltaStepAngle = deltaStepAngle(1);

% get input (I) and output (O) interpolation grids

servoAnglesI = min(servoAngle):deltaServoAngle:max(servoAngle);

stepAngles = min(stepAngle):deltaStepAngle:max(stepAngle);

[stepAnglesI,servoAnglesI] = meshgrid(stepAngles,servoAnglesI);

servoAnglesO = -fanAngleWidth/2:fanAngleWidth/2;

stepAngles = min(stepAngle):deltaStepAngle:360-1.8;

[stepAnglesO,servoAnglesO] = meshgrid(stepAngles,servoAnglesO);

% do the 2D interpolation to the centered grid that we will use for recon

fanBeamDataCent = interp2(stepAnglesI, servoAnglesI, fanBeamData’, stepAnglesO, servoAnglesO, ‘cubic’, 0);

%servoAnglesI’, stepAnglesI’, fanBeamData,servoAnglesO’,stepAnglesO’,’cubic’,255);

%fanBeamDataCent(fanBeamDataCent > 100) = 255;
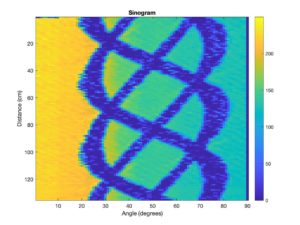
%sinogram

figure;imagesc(abs(fanBeamDataCent));

title(‘Sinogram’);

xlabel(‘Angle (degrees)’);

ylabel(‘Distance (cm)’);

colorbar 

%%%%%%%%%%%%%%%%%%%%%%%%%%%

% reconstruct the image

%%%%%%%%%%%%%%%%%%%%%%%%%%%

 img = ifanbeam(fliplr(fanBeamDataCent),D,’fancoverage’,’cycle’,’fanrotationincrement’,…

    deltaStepAngle,’fansensorgeometry’,’arc’,’fansensorspacing’,1,…

    ‘filter’,’Ram-Lak’,’frequencyscaling’,1,’interpolation’,’nearest’,…

    ‘outputsize’,N);

figure;imagesc(-img);axis image;colormap gray

title(‘Reconstructed Image’);

final reconstruction image

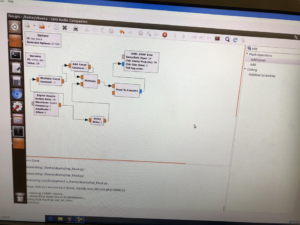
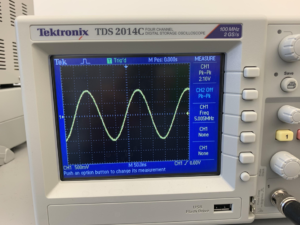
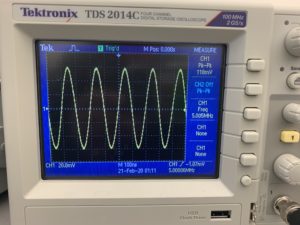
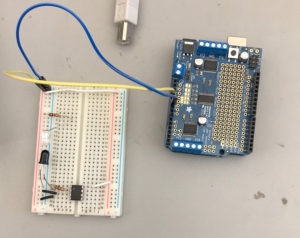
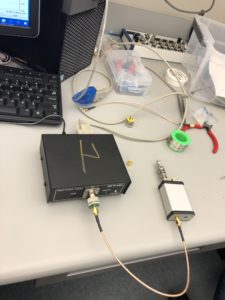
We also began to make our ultrasound scanner. We re-made the agar graphite phantom, since our phantom from last week separated into layers, and we soldered photodiodes, capacitors, inductors, and connectors onto our PCB board for the transmit/receive switch. Next, we used a windows software to  measure the power return loss of the switch. We found a 17 dB return loss. The set up of the T/R switch connected to the hardware and a screenshot of the frequency curve is shown below.


IMG_3921

IMG_3922

Question:

What values do you get for L and C?

L = 1.59  uH

C = 637 pF

IR CT Scanner Update #4

Update #4

Danielle, Antonio, Hannah

This week, we captured our CT data in a text file and reconstructed it. The shape of our sinogram looks accurate, but there is higher intensity light observed at lower degrees (0 to 30 degrees), which is indicated by the yellow color, and lower intensity light observed at higher degrees, which is indicated by the aqua color. These findings show that one side of the CT scanner is more exposed to light, probably from the classroom window, than the opposite side. Our reconstructed image looks somewhat accurate, but we suspect that our measurements are undersampled. Next week, we will increasing the number of samples/time period and will collect data with the blinds closed and a tarp covering the scanner. Below are images of our sinogram and reconstructed image.

sinogram

Figure 1: Sinogram

Reconstructed Image

Figure 2: Reconstructed image

Question: What parameters of your scanner and scan method influence resolution? Investigate these.

We have the servo motor moving the swing arm 90 degrees and the stepper motor moving once when the swing arm finishes its rotation. We should switch the order of the servo motor and the stepper motor so that the stepper motor rotates 270 degrees and then the swing arm moves once. This would increase the resolution because the stepper motor is more stable than the servo motor, so it would reduce the probability of motion artifacts.

We also expect the size of our detector and the distance between the fan beam and motors to affect our resolution. We plan to investigate all of these parameters next week and see how the resolution improves.

IR CT Update #3

Update #3 

Danielle, Hannah, Antonio

    Last week we predominantly worked on the software and data acquisition. Because we were having difficulty with the serial communication between the Arduino and Matlab, we decided to write Python code that would perform the serial communication instead. Below is the Python code that communicates with the Arduino from the serial port. The Python code reads successive lines from the serial port as the Arduino is taking data and then stores the projection angle data into the array byte_data. Because the data the Arduino prints to the serial port is in byte form, the script decodes the byte data, splits the values after each comma, and then stores them in an array. Once all of the data is received, this code writes the array to a text file on the users computer in ASCII format which is important. Because the text file is in ASCII format, matlab can very easily load the data from the text file directly into an array using the load() command. From here, the matlab code below can be used to perform filtered backprojection and reconstruct the image.

Question

What is the finest resolution with which you can move the swing arm (servo) and stage (stepper motor)? What does this dictate about the finest spatial resolution of your image

The finest resolution with which we can move the servo is 1.8 degrees and for the stage, 200 steps per resolution. This means that the finest spatial resolution is determined by whichever component has the largest angle of rotation.

Question

The servo has an extra (white) wire on it, that reads out its built-in position potentiometer, which you can use to record the servo’s actual position (rather than just its intended position). Is your image reconstruction improved by using this value instead of the intended value? 

Our image reconstruction is improved.

Our Python code

Screen Shot 2020-01-27 at 11.19.52 PM

Our Matlab code

Screen Shot 2020-01-27 at 11.20.01 PM

1/16/2020 Infrared CT Update #2

1/16/2020 Infrared CT Update #2

Antonio Glenn, Hannah Kilpatrick, Danielle Liu

This week, we finished building our two circuits and attached them to our IR CT scanner using velcro. The photodiode in the circuit was oriented so the long leg was closer to the power supply so that we read a positive output voltage. Using the data sheet of the op amp, we calculated that when the LED and photodiode were 10 cm apart, a 300 ohm feedback resistor would use the most Arduino input range between light and dark states of the LED.

Next, we programmed the Arduino to measure analog input from the photodiode circuit and output the values in Matlab. This allows us to collect all our data through Arduino and then process the signal in Matlab. We also began programming the Arduino to move the stepper motors, which is shown in the video below.

Below is an image of our IR CT scanner with the circuits attached to the frame with velcro. The left circuit powers the emitter and the right circuit powers the detector.

Picture1

Link to video of stepper motors: IMG_9876

Arduino code for controlling stepper motors and reading photodiode data:

#include <Wire.h>
#include <Adafruit_MotorShield.h>
//#include <Adafruit_PWMServoDriver.h>

// Create the motor shield object with the default I2C address
Adafruit_MotorShield AFMS = Adafruit_MotorShield();
// Or, create it with a different I2C address (say for stacking)
// Adafruit_MotorShield AFMS = Adafruit_MotorShield(0x61);

// Connect a stepper motor with 200 steps per revolution (1.8 degree)
// to motor port #2 (M3 and M4)
Adafruit_StepperMotor *myMotor = AFMS.getStepper(200, 2);

//Photodiode
int sensorPin = A0;
int sensorValue = 0;

void setup() {
Serial.begin(9600); // set up Serial library at 9600 bps
pinMode(sensorPin, INPUT);

AFMS.begin(); // create with the default frequency 1.6KHz
//AFMS.begin(1000); // OR with a different frequency 1KHz

myMotor->setSpeed(10); // 10 rpm

}

void loop() {
Serial.println(“Single coil steps”);
myMotor->step(100, FORWARD, SINGLE);
myMotor->step(100, BACKWARD, SINGLE);
}

1/9/2020 Project Update #1

Antonio Glenn

Hannah Kilpatrick

Danielle Liu

This week, we soldered lead wires into the IR LED emitter and photodiode in their holders in the frame. We designed and built 2 circuits. One circuit used the 5 V Arduino to power the IR LED and the other circuit was an op amp circuit that converted the photodiode current into into a detectable voltage signal. We tested that our circuits worked by adding and removing the detector and observing a change in voltage.

Below is a photo of our hardware and a link to a video of us testing our circuit.

2019012020 Circuit Test 2019012020 Circuit