Ultrasound Scanner: Week 3 Blog Post

Myron Mageswaran, Alex Boyd, and Maggie Ford


During week 3 for this lab, we first tinkered with the GNURadio software in order to create the desired input into the switch using the radio shown in Figure 1.  This task took longer than expected, but we were able to set up an input signal that was pulsed for one microsecond using the schematic shown in Figure 2.

Screen Shot 2020-03-16 at 10.46.10 PM

Figure 1:  the software defined radio that is interfaced with the Linux virtual machine

Screen Shot 2020-03-16 at 10.47.00 PM

Figure 2: block diagram schematic

After programming the Arduino, we were ready to take our first scan and took out our cast out of the mold and filled our bin with water only to realize that we only had three minutes remaining in class, (and unsuspectingly the rest of the semester) so we did not have time to take any actual readings.

Question: What is the purpose of the quarter wave line?                                                  The quarter wave line is able to change impedance creating either an open or closed circuit to Rx, which creates the switching effect.

Ultrasound Scanner: Week 2 Blog Post

Myron Mageswaran, Alex Boyd, and Maggie Ford

This week we worked on:

  • Testing the T/R Switch we made last week
  • Getting familiar with the GNURadio Software

In order to test the return loss at each port (TX input, TX output, and RX), we used the antenna analyzer to inject a 5 MHz signal into each port of the transducer. Before we could do this, however, we had to calibrate the antenna analyzer using a short circuit load, an open circuit load, and a load with an impedance of 50 Ohms. Once the antenna analyzer was calibrated, we connected the oscilloscope to the TX input, TX output, and RX ports and measured the return loss at each port with the antenna analyzer when the other ports had an open connection and when the other ports had a load with an impedance of 50 Ohms. The data we collected suggests that the return loss is nearly zero except when a 5 MHz signal was injected into the TX output port and the resistive load was connected to the RX port, as well as when a 5 MHz port was injected into the RX port and the resistive load was connected to the TX output port. The test data we collected is depicted below.

Screen Shot 2020-02-24 at 8.33.13 PM

We spent the remainder of the class period on Thursday setting up the virtual machine with the GNURadio software and familiarizing ourselves with how to use the software. Depicted below is a picture of the software defined radio that we are interfacing with using the Linux virtual machine.

Screen Shot 2020-02-24 at 8.34.17 PM

Feb 4th Blogpost

Alex Boyd, Maggie Ford, and Myron Mageswaran


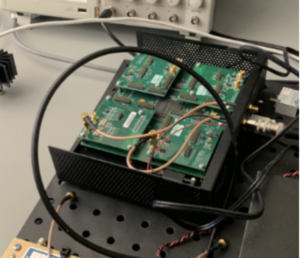
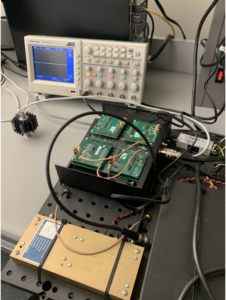
The construction of the actual scanner was completed in previous labs, so the past week was spent mostly collecting data and then polishing the MATLAB code to try to improve the reconstructed image.  The first image collected (Image 1) was overall somewhat clear, but for a portion of the collection, the photodiode was unplugged, so the image contains a blurry spot from the incorrect data points.  Students then took another complete data set to use for the reconstruction. This new image (Image 2) was very clear, but had a bit of a ring around the object.  To correct this, students remeasured, adjusted, and tested the FOV and other parameters and used the best corresponding values.  

Screen Shot 2020-01-28 at 11.35.39 AM

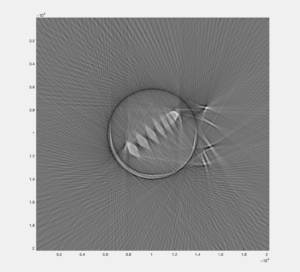
Image 1: The first image students reconstructed using the data set that had the photodiode disconnected for a portion of time evidenced by the region circled on the right side

Screen Shot 2020-01-28 at 12.13.16 PM

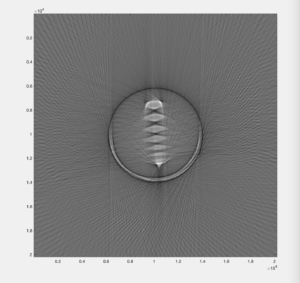
Image 2: The new image students reconstructed using the complete data set 


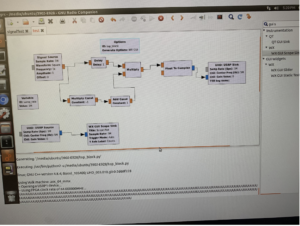
MATLAB CODE: Below is the code that students used for the reconstruction of the images with comments to follow along


%Reconstruction of an Infrared CT Scanner


%%%%%%%%%%%%%%%%%%%%%%%%%%%

% load the projection data

%%%%%%%%%%%%%%%%%%%%%%%%%%%


% full phantom data – acquired over 360 degrees of stepper motor

load phantom2Trial1.mat; % data file you generate – needs to contain diodeVoltage, servoAngle, and stepperAngle


%%%%%%%%%%%%%%%%%%%%%%%%%%%

% recon parameters

%%%%%%%%%%%%%%%%%%%%%%%%%%%

N = 20200; % matrix size

FOV = 17.45; % cm, FOV of image matrix

Dcm = 7.78; % cm, distance from fan beam vertex to center of stepper motor shaft

D = Dcm*N/FOV; % vertex->center distance in pixels

fanCenterAngle = 80; % fan center angle 

fanAngleWidth = 100; % total width we need in degrees for the fan beam to cover the object


%%%%%%%%%%%%%%%%%%%%%%%%%%%

% subtract off the center fan angle from the servo angles, to center them

%%%%%%%%%%%%%%%%%%%%%%%%%%%

servoAngle = servoAngle – fanCenterAngle;


%%%%%%%%%%%%%%%%%%%%%%%%%%%

% reshape data into a fan beam sinogram matrix. We assume that servo angle

% is minor dim in diodeVoltage vector

%%%%%%%%%%%%%%%%%%%%%%%%%%%

nServoAngles = length(unique(servoAngle));

nStepAngles = length(unique(stepperAngle));

fanBeamData = reshape(diodeVoltage,[nServoAngles,nStepAngles]);

% potVoltage = reshape(potVoltage,[nServoAngles,nStepAngles]);


%%%%%%%%%%%%%%%%%%%%%%%%%%%

% interpolate along the fan beam dimension to center the data

%%%%%%%%%%%%%%%%%%%%%%%%%%%


% find increment between servo Angles

deltaServoAngle = abs(diff(unique(servoAngle)));

deltaServoAngle = deltaServoAngle(1);

% find increment between stepper motor angles

deltaStepAngle = abs(diff(unique(stepperAngle)));

deltaStepAngle = deltaStepAngle(1);


% get input (I) and output (O) interpolation grids

servoAnglesI = min(servoAngle):deltaServoAngle:max(servoAngle);

stepAngles = min(stepperAngle):deltaStepAngle:max(stepperAngle);

[stepAnglesI,servoAnglesI] = meshgrid(stepAngles,servoAnglesI);

servoAnglesO = -fanAngleWidth/2:fanAngleWidth/2;

[stepAnglesO,servoAnglesO] = meshgrid(stepAngles,servoAnglesO);


% do the 2D interpolation to the centered grid that we will use for recon

fanBeamDataCent = interp2(stepAnglesI,servoAnglesI,fanBeamData,stepAnglesO,servoAnglesO,’cubic’,0);


%%%%%%%%%%%%%%%%%%%%%%%%%%%

% reconstruct the image

%%%%%%%%%%%%%%%%%%%%%%%%%%%

img = ifanbeam(fliplr(fanBeamDataCent),D,’fancoverage’,’cycle’,’fanrotationincrement’,…

    deltaStepAngle,’fansensorgeometry’,’arc’,’fansensorspacing’,1,…

    ‘filter’,’Ram-Lak’,’frequencyscaling’,1,’interpolation’,’nearest’,…

    ‘outputsize’,N);

figure;imagesc(-img);axis image;colormap gray


Question 1:

What happens if you more coarsely or finely sample the stepper motor positions?  The finer the stepper motor position, the higher resolution of the image because there are more data points.

IR CT Scanner Week 2

Alex Boyd, Maggie Ford, Myron Mageswaran

Because we previously finished our current to voltage op amp circuit, we spent a majority of our time this week programming the Arduino to move the stepper motor and servo.  We were then able to report the servo and stepper positions to the serial monitor along with the voltage output. We programmed the motors such that the servo with the IR LED and photodiode fans across the object that is being imaged and then returns to its initial position. Once the servo finishes fanning across the object, the stepper motor rotates a specified range to prepare a new view for the next time the servo fans across the object.

Next week, our focus will be to read the Arduino’s serial output using MATLAB (voltage and motor positions) in order to reconstruct our data into images. We also need to fine tune how much the stepper motor rotates each time the servo fans over the object in order to maximize spatial resolution.

Video 1:  This video shows the servo sweep the IR diode across the object that is being scanned, return the IR diode to its initial position, the stepper rotate the object a small amount, and the process repeats.  

Arduino Servo and Stepper Moving

Matlab Code: This is the code we have written to read the Arduino’s serial output and store the data as a matrix in Matlab. So far, we have only written code to read the voltage output, but we will add to the code to include motor positions as well.

% create arduino object

a = arduino(‘port’,‘board’);

% create time vector

v = zeros(500,1);

t = seconds(v);

t0 = datetime(‘now’);

% enter voltage readings into a vector as time elapses

for ii = 1:length(v)

    v(ii) = readVoltage(a,‘pin’);

    t(ii) = datetime(‘now’) – t0;

end

Question: The servo has an extra (white) wire on it, that reads out its built-in position potentiometer, which you can use to record the servo’s actual position (rather than just its intended position). Is your image reconstruction improved by using this value instead of the intended value?

Answer: Using the actual position output from the servo does not improve the image reconstruction because these values are no different than the servo’s intended position.  Therefore, we will utilize the servo’s intended position values for our purposes of this scanner.

Question: Why is the Matlab function fan2para() function needed?

Answer: The fan2para() function in Matlab is needed to convert the fan-beam projections into parallel-beam projections because the IR CT scanner has a fan-beam geometry, but filtered backprojection algorithms require parallel-beam geometry.